
How to use Global Village
This is the documentation for Global Village. Unfortunately it is not yet complete, but then neither is Global Village.
Contents
Introduction

The primary goal of Global Village is to generate images of the Earth and other planets and place these on the users desktop. It does this by downloading data and generating scripts for Xplanet. These doc's assume you have already installed Xplanet and Global Village.
Global Village can be found on the main Gnome menu under the Graphics sub menu. Once launched there will be an icon on the notification area of the Gnome panel.![]()
Clicking this will show or hide the main window. Right clicking will pop up a menu.
The Tool Bar Icons
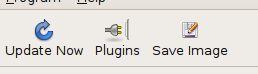
The 'Update Now' button will force Global Village to generate a new background image instead of waiting next automatic update. The 'Refresh' menu item on the notification icon will do the same.
The 'Plugins' button toggles the Plugin Manager window, click again to close it.
No one really knows what the 'Save Image' button does, but there is a menu item (as with the Plugins button) that does the same ;-)
Target Options
These determine what will be drawn, and how it will be drawn. The 'Planet' and 'Projection' lists select what and how, the 'Centered On' is mostly aimed at planet Earth.
The 'Centered On' list has a few default options such as the North and South Poles. Selecteting 'Add New...' will pop up a window asking for a name for a cutome location, after which you can edit the Latitude and Longitude. These can be re-edited at any time or removed, except for the default locations.
Advanced Options
For most of thse options you should refer to the Xplanet man pages.
The 'Update Interval' setting is a time in seconds between each automatic update of the desktop image. If set to 0 (zero) seconds there will be no automatic updates. The maximum setting is the equivilant of 24 hours.
Planetary Image Maps

This tab handles the main images used to generate the desktop backgrounds. There are many sources for planetary maps on the internet, a good source is the Xplanet map page and NASA's Blue Marble images.
You can select a planet to manage, and drag and drop images into the list, and drag the images to re-order them, or right click to remove and image from the list.
For planets other than Earth, the first image in the list is used. Earth is a special case as there are sources for images taken at different times of the year. If there is more than one image for Earth then Global Village will divide the images equally throughout the year, starting with the first.
There are special buttons for Night, Bump and Specular maps which can be used to improve the final image as well as an option to download clound maps for Earth.
Plugin Management
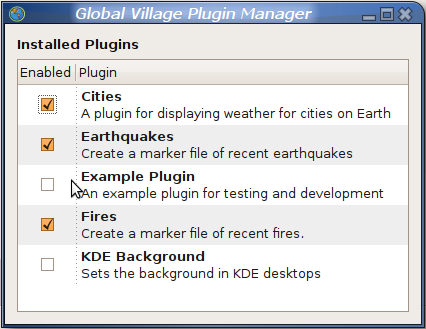
This widow, accesed from the 'Plugins' button on the toolbar or the Program menu presents a list of installed plugins.
These can be turned on or off by clicking the check box for each plugin.
The Cities Plugin

A list of Cities to be displayed on the desktop. These are selected from the list of available cities generally hidden bellow, but shown in this image. Drag and drop from the available list to the visible, and right click to remove them. You can change the name by clicking on the text.
The three check boxes select what is displayed, the weather, the name of the location and the local time.
The Styles and the Random location features are not yet implimented for this plugin.
Hari Nair.
None of this would be possible with out his Xplanet
Global Village is

Do you code in Python? Why not take Wing IDE for a test flight...

And a big thanks to
for hosting this, and many other worthwhile projects.